
Sunday, June 17, 2007

PROTECT YOUR SYSTEM FROM DUMB INSTALLATIONS!!!

If one more program installs an icon in my system tray without permission, I'm going to buy a Mac. I don't want icons and links scattered all over my desktop, Start menu, and system tray.

The Fix: There are plenty of arrogant companies that toss their icons around -- Netscape, AOL, RealOne, and Yahoo, to name just a few. (Real is probably the worst, and I've banned the program form my PC.)
You can stop this icon madness by following these five tips.
  • Watch the installationStay alert during the installation. If you have the option, always opt for the custom installation. You'll probably have a choice of where the program plants its icons. Besides avoiding system tray litter, you can also stop programs from adding icons to the Start menu and desktop.
  • Protect your system trayWinPatrol is a free early-warning system that stops unsavory programs, such as Trojans, phone dialers, and spyware, from doing damage to your system or reporting your surfing habits to others. WinPatrol watches for anything that adds itself to the Startup group or Windows Registry, flags suspicious items, and offers to remove nasty programs. In order to remove or disinfect the offending program, you'll still need a spyware removal tool, such as Spybot, and an antivirus program.
  • When WinPatrol starts yelling about an unwelcome entry, you can allow the program into your Startup group if it's legit; if you say no, and the program tries again, WinPatrol blocks subsequent attempts. That's especially handy for notoriously insistent programs such as QuickTime, RealPlayer, and MSN Messenger.
  • WinPatrol also lets you see a list of Active Tasks, cookies, and Win XP's running Services, and it works with all versions of Windows. In most cases, you can also gain some insight into the applet's source and purpose. For $13, WinPatrol Pro provides an extensive database to further identify what's trying to get into your system tray. The program is available at http://www.oreilly.com/pcannoyances.
  • Make a clean sweepStart by hovering the pointer over the icon to identify the application it belongs to -- then decide if the icon needs to be in the system tray. (Most don't. Programs such as RealOne Player, RealPlayer Jukebox, ATI's Video Manager, and AOL's Instant Messenger are typical culprits.) Select Start > Programs ("All Programs" in XP) > Startup to see what's in your Startup group, and you'll probably find a few programs you can dump.
  • To dig deeper, use Windows msconfig (select Start > Run, type msconfig, and press Enter) or use Startup Control Panel, a free utility that lets you examine and remove programs that are loaded at startup (get it at http://www.oreilly.com/pcannoyances).

Thursday, June 14, 2007

PROTECT YOUR PASSWORDS FROM HACKERS!!!!!!!!

How HACKERS hack & crack Yahoo passwords ?
1: Many people use MAGIC PASSWORD STEALER (MPS) Trojan to hack yahoo passwords.
  • A lot, and I mean a lot of people are infected with Magic PS. Especially with Magic PS 1.5 Second Edition. If you don't know what is Magic PS. Magic PS is a trojan, simply a program that steal your Yahoo! Messenger 5 or 6 user name and password to the sender. Magic PS 1.5 SE no longer show itself in the Message Archive, so checking there won't help.
  • If the sender is stupid enough, he/she would sent you the file "sender.exe", DO NOT accept it because it is the default name for a MPS created file.
  • Check your computer for certain files such as these:
  • regsvr.exe in c:\Winnt or c:\Windows ; depends on version of Windows.
  • MsAgent32.exe in c:\*Win installed folder*\system 32
  • Perflib-Perfdata in c:\*Win installed folder*\System32
  • PIF in c:\*Win installed folder*.NTMSJRLN in c:\*Win installed folder*\system32\NtmsData(Sender.exe)
  • MPSmmtask0.exe in c:\Documents settings\*User Name*\Local settings\Temp
  • The sender.exe (can be any name) file may also contain a text string "UPX-Scrambler RC1.x -> ?OnT?oL". You can see this by using a hex editor, etc.
  • MPS 1.5 SE hides the (sender/hacker) Yahoo! ID in the sender.exe file, it is scrambled so even with a hex-editor, you still cannot view it. To reveal the (sender/hacker) Y! ID, simply reverse-engineer the sender.exe file.
  • Solution :: Do not receive any executable files from a unknown person on chat.

2: BY using fake login screens.

They ask you to have a look at their picture by sending a link to yahoo fake login screen. It exactly look like mail.yahoo.com page or photos.yahoo.com page.It will ask you to enter your ID & password to login. If you enter your details those login details directly goes into hackers inbox. So be careful of these kind of attacks.

3: Cracking passwords By using Yahoo Password Cracker.

There are many Password crackers out for cracking Yahoo passwords.If you are using a dictionary based password like ? something, 12345, abcdef, Attitude, etc? It takes hardly 3 hours for a good cracker to crack the password.

Solution : Never use dictionary based passwords. Use a password like this..Example : (Sec*)Pass+) . This kind of passwords are impossible to crack

Friday, June 8, 2007

HOW TO REPAIR XP AND AVOID A FULL REINSTALL!!!!!!!!!!!

One of the ideas behind the Windows XP installation CD was that it was supposed to make installing Windows a whole lot easier. Less errors, simpler choices, and removing installation confusion sound pretty good to most of us, right? Microsoft had hoped for XP to be as pain-free and easy to install as possible. Unfortunately, reality had other plans for some XP users. While it is extremely rare to have major issues installing a fresh copy of XP on a computer, reinstallations can frequently be troublesome even when doing things by the book. Lucky for us Microsoft has provided us with specific tools to help us deal with these situations.


  • While this may seem like very little comfort when compared to XP's many shortcomings, these tips can often keep a bad day from getting a lot worse, if you know what I mean.
  • Let's start by looking at some tips and utilities for dealing with XP issues before jumping into a XP reinstall.
  • Last known good config: Always the easiest to try first before settling for a reinstallation of Windows XP. Reboot the PC and tap F8 while you wait for boot options to be displayed for you. Once there, choose "Last known good configuration."
  • System restore: In some cases, a reinstallation can be avoided by using system restore. If you are unable to get system restore to work from within safe mode, you can try to access it from within a command prompt. You do not need to leave safe mode to do this, just follow these instructions closely:
  1. Reboot into safe mode with a command prompt.
  2. Get to an administrator account so that you have the needed permissions to get things done.
  3. At the command prompt, type: %systemroot%\system32 restore strui.exe
  4. Follow the instructions to restore your PC to an earlier state of operation.
  5. Recovery console: The XP recovery console can be a very useful utility when employed with care. There are a variety of situations where having access to it can be really handy. In fact, you need to get access to it before we go any further.
  6. Reboot from the Windows XP CD. Once you arrive at the welcome screen, choose "R" for recovery.
  7. You will be asked which Windows installation you wish to access. Choose the appropriate number.
  8. Now a prompt for your administrator password will appear. Enter it and continue (if no password, press enter).
  9. Now we are ready to roll up our sleeves and get to work. While at the console, you can type help for a list of available commands that are at your disposal. For example, you can repair a messed up boot sector by typing FIXBOOT and then typing enter afterward. If you are having difficulty booting up because of a messed up ntldr file, however, then you might need to replace it by typing:
  10. COPY E:\i386\NTLDR C:(Keep in mind this is assuming that E: is the correct drive letter for your CD ROM drive). Once you have repaired what you have needed to from the recovery console, simply type EXIT at the prompt to leave and restart Windows.
When all else fails, sometimes reinstalling is the best medicine. Below, we will look at two very different methods to accomplish this.
Repair installation: Running a repair install of Windows XP can be a handy way of fixing the installation of XP without having to start totally over and deleting important data from your PC. To do this type of install, simply follow these instructions.

Boot from your XP installation CD.
  1. At the welcome screen, choose enter.
  2. Once at the license agreement, press F8.
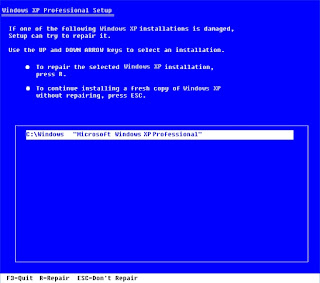
  3. At the next screen, choose to repair the selected Windows XP installation by pressing R.
  4. The files will begin to install and then your PC will reboot. During the reboot you will be presented with option of booting from the CD again by pressing any key. Don't press anything. Allow it to finish the install without booting from the CD again.
  5. Full reinstallation of Windows XP: If all else fails and you are ready to completely delete everything on your hard drive, then you are ready to do a full reinstallation.
  6. You will be erasing everything, so make sure you already have a backup of any important data before you continue. Follow the instructions above 'til you arrive at step 4. At that point, choose to continue installing a fresh copy of XP on your system and NOT the repair option. Black Viper has a great walkthrough that will take you step by step through the nuances of setting up your partitions, formatting, etc.
Well, that should about cover how to deal with repairing and if need be, reinstalling Windows XP.

Sunday, June 3, 2007

CONVERT CASSETTE TAPES TO CD!!!!!!!!!!

If you have an audio cassette tape that you'd like to transfer to a CD, it's easy to do with your PC and some standard inexpensive cables you can find at almost any electronics store. Read on for complete instructions.
EQUIPMENT NEEDED:
HARDWARE:"Cassette Deck ,Computer With Sufficient Harddisk (to store the .wav files) and RAM (to edit and process the files), CD Writer, Soundcard Interconnect cables for connection between the cassette deck and the soundcard, SOFTWARE"
Audio Recording Software
Noise Reduction Software or Plug-in (Optional)
CD Authoring Software
CONNECTIONS & PROCEDURES:
  • Connect the LINE OUT of the Cassette deck to the LINE IN of the Computer Soundcard
  • Select the soundcard as the prefered recording device (under control panel - multimedia icon)
  • Ensure the LINE IN Fader on the audio mixer of the computer is not muted
  • Launch the audio recording software
  • Depending on the software used, activate and check all the settings to allow recording
  • If possible, monitor the incoming signal from the cassette deck using the audio software to ensure the incoming signal is not clipping (Too Hot; Levels Too High)
  • Set the appropriate levels for recording and rewind the cassette tape.
  • Activate the recording on the computer and playback the cassette tape
  • Once the material on the cassette tape has been recorded into the computer, save the material as .WAV format and edit the wave files accordingly.(Break them up and save them into the individual tracks; process the files with the noise reduction software; edit out the unwanted parts; etc.)
  • When all editing have been completed, the number of .wav files should correspond to the number of songs on the cassette, unless some songs have been omitted.
  • Next, close the audio recording software (Be sure to save all your work) and launch the CD authoring software.
  • Select for audio CD writing and import the .wav files and arrange them according to the sequence required (Exact procedure of import would be dependent on the software used)
  • Load in a blank CDR disc and write to the disc using disc-at-once mode and finalized as a CD-DA format (Exact procedure of writing would be dependent on the software used)the computer, audio recording software and noise reduction software, your editing skills, etc.

Chose a good CDR disc to ensure durability and intergity of the disc.

Try with different brands to see which works well with your CD writer and can playback on your CD Player.

Remember that the limit for a regular CDR is 74mins of audio or 650M byte of data.

If you use a 80mins CDR disc, make sure both the CD writer and CD authoring software supports it.

There are many software out there, some are specifically for recording or CD authoring while others are an all-in-one solution.

Pick one that is most suitable to your needs, applications and budget.

Ultimately, the quality of your end result will depend on several things such as the inital sonic quality of the cassette, the quality of the soundcard used, the power and flexibility of

Saturday, June 2, 2007

WHAT CAUSED MY BLUE SCREEN OF DEATH(BSoD)!!!!!!!!!!!

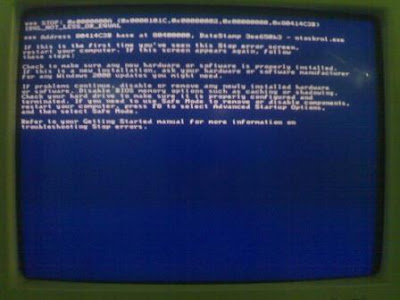
The Blue Screen of Death is commonly displayed when the system is haulted to save the system from a major error or when it can not recover from a serious error. Here's a common picture of a BSoD
  • Firstly, when your system crashes, by default it saves a file to your hard drive with quite a bit of information. Those files are called Dump Files and they are located in the C:\windows\minidump folder. The files are created using either of these two naming conventions:
  1. Minixxxxxx-0x.dmp where xxxxxx is the date the system cashed and -0x corresponds to the number of times the system crashed that day. The higher the -0x number the more recent the crash.
  2. Dumpxxxxxx-0x.dmp where xxxxxx is the date the system cashed and -0x corresponds to the number of times the system crashed that day. The higher the -0x number the more recent the crash.

Let's start decrypting the info found in the dump file.

  • First, we need to download and install the Microsoft Debugging Tools from here: U WANT TO BE MICROSOFT DEBUGGING TOOLS : Post Your Mail ID to following this Link http://www.blogger.com/email-post.g?blogID=838102387059097317&postID=5696605637935079135
  • After installing we open the Debugging Tools by going to the Start menu > Programs > Debugging Tools for Windows > windbg . When the Debugging Tools for Windows program opens click on File then Symbol file path. Put this in the text box: SRV*c:\websymbols*http://msdl.microsoft.com/download/symbols
  • Now click the OK button. Now we open the dump file by clicking File then Open Crash Dump. We browse to the C:\windows\minidump folder and choose the dump file we would like to look at. When it's done loading you'll see the words "BUG CHECK ANALYSIS" in an * box.
  • In the text box below (to the right of kd>) type in !analyze -v to get a word-for-word output of the error. Once it is completed look for the section the text right after "BUG CHECK ANALYSIS". There you will have some words with underscores in between each word. Sort of like IRQL_NOT_LESS_OR EQUAL. That will help you find a solution to your problem. Also, scroll to the section IMAGE NAME: . The words after that will tell you what file caused the error.

RECOVER DELETED FILES!!!!!!!!!!!


Have you deleted a file that you need and now you don't know how to get it back? Using a simple, free program, you can recover those deleted files!
  • The first step is to make absolutely sure that it has been deleted. Open your Windows Recycle Bin and double-check. Is it in there? If so, simply right-click on the file and choose Restore.
  • If you have emptied your recycle bin since deleting the file or folder you need, you still have an option, though. Restoration is a free utility that can search your computer for deleted files. Recovering them is a snap. And you don't even have to install the program - it can run from anywhere, including thumbdrives or CD-ROMs.

U WANT TO BE DOWNLOAD THE RECOVER DELETED S/W: Post Your Mail ID to following this Link http://www.blogger.com/email-post.g?blogID=838102387059097317&postID=215922876132193471

  • After you have downloaded the file, double-click the icon and it will extract itself into a folder. Open the folder (it will probably be called something like REST.Zip) and double-click the icon that says Restoration. You should see a screen similar to this one:
  • Now, you can click the Search Deleted Files button, and it will display every file on your PC that was deleted and might be recoverable.
  • Note: Files removed from your recycle bin MAY NOT have the same name as when you deleted it. For instance, if I delete the file "Firefox Setup.exe", it may appear in Restoration as "DC411.exe". The trick is to look for files that are in a folder called C:\RECYCLER\ or something similar in the Restoration screen.
  • The best way to find a file by far is to sort by deletion date. If you know that you deleted the file today, it can go a LONG way towards finding the correct file to restore.
  • Once you find the file, just click on the Restore by Copying button, and you will be prompted to save the file somewhere. It's always a good idea to save the file to a different drive than the one you are recovering it from
  • We hope this helps you recover your deleted files!

MY COMPUTER IS SLOWING DOWN,"WHAT CAN I DO"!!!!!!!!!


This question comes up on a regular basis in our forums. The information given here is focused on the XP operating system, but some of it applies to other Windows systems as well. Here are some basic steps to follow:
Ideally, you should have 512MB RAM. If you don't, but bring it up to 512 (more if you can afford it and your PC will accept it, like 1 gig ) you'll see a marked increase in speed. Other than the following tips, this is the cheapest and most efficient way to increase speed.
  • How much free space do you have on your hard drive? Between 15% and 20% is ideal. XP and the other programs you have, not only require RAM memory to work, but also use your Hard Drive (Virtual Memory, which allows a computer program to behave as though the computer's memory is larger than the actual physical RAM. The excess is stored on hard disk and copied to RAM as needed.) Many large or data intensive programs and games these days require a lot of memory to operate seamlessly (no stalls or freezing).
  • One thing you can do to save space is go to Control Panel >System >System Restore Tab >make sure the box 'turn off System Restore on all drives' is NOT checked >move the slide bar to 4% to 6%, (this will give you more than enough restore points and free up 6% to 8% of your HD. (That's 6 to 8 gigs on a 100 gig drive) >OK.
  • Another thing you can do is clean up your personal files and to save the important ones to disk/CD, delete the garbage files and only keep the important current files. Also, uninstall programs you are no longer using (either use the program's uninstall process or the Add/Remove Programs in the Control Panel). Remember, you're aiming for 15% to 20% free HD space.
  • If you need all the programs and data files, think about installing a slave hard drive and saving your files to that .. programs too (other than operating system).
  • In Internet Explorer go to - Tools >Internet Options >General Tab >Delete Files while there, Delete Cookies also. Note: This does not delete your Favorites, but login information to your favorite sites will be deleted. If you don't have a printed list of login names and passwords, now is a good time to make one before deleting cookies. (For security purposes, you should never keep your passwords on your PC). However, a program such as Webroots 'Window Washer' will do all this for you while protecting the login information from being deleted. If you are using other browsers, ask in a post for instructions.
  • Have you run chkdisk? This will check your C: drive (or which ever drive you have your operating system on) for errors, and repair any damaged or changed Windows files. You do this by going to Start > My Computer > right click C: drive >Properties >Tool >under Error Checking >Check Now > check both boxes >Start. It may say that chkdsk will run when you next reboot .. Reboot/restart now and let chkdsk do its thing. Note, if you have tweaked the registry to change some of the windows features, they will return to their default settings.
  • Defragment your Hard Drive. As time goes on, the information on your Hard Drive becomes displaced and scattered. Your HD has to work harder finding this data and putting it together when you need it. Defragmenting pulls the data all together, making retrieval faster and working the HD less. To defragment go to Start >Programs >Accessories >System Tools >Disk Defragment. (You can also defragment from the same window as you used when you checkdisked). You should try to do this a least once a month, more if you're a heavy user. If you haven't done this at all or for quite some time, this process can take awhile to complete. Let this be the last thing you do at night or if your not going to need the computer for an extended period. Regular defraging will not take so long in the future. Defraging is best done in 'Safe Mode', this way there are minimal programs working in the background which slow down the process.
  • Have only one anti virus program running. More than one running can cause conflicts and slow you down.
  • Before doing any of the following steps, make sure System Restore is turned on (it should be if you have adjusted the setting to 4% to 6% above) you create a new Restore Point. Start > Help & Support > select 'undo changes to your computer with System Restore >click the radio button 'Create a Restore Point' >Next >type in a name that you'll remember should you need to restore .. something like Good Restore Point .. >Create ..a restore point will now be created and you can go on to the next steps.
  • Other areas that can cause slowdowns are the programs that run in the background. There are 2 built in utilities in XP that manage these. The first is msconfig .. go to Start >Run >type in msconfig >OK >Startup tab. Here you will see a listing of programs, the ones with a check mark in the box are running the second you turn on your computer. Most software companies feel that their program is so important, that you'll want it available in a split second. Most of these programs are taking up valuable RAM memory and slowing down the bootup process as well as your programs in general. With the exception of security software and a few others, most do not need to be running. You can uncheck the boxes of the ones you want stopped and click Apply >OK. It will then ask if you want to restart your computer for the changes to take effect >select to restart. When Windows starts up again, a configuration window will open. Just click the box saying not to show this notice again >OK. Your done. Should you want easy access to a particular program, you either go to Start >All Programs, or create a shortcut on your desktop (this does not take up memory). Note: by stopping the program from running, you are not deleting it, nor are you stopping access to it. You can always go back in and check the box again. If you have any questions on these startup programs. Feel free to ask the advice of our members in your post.
  • The other utility is Services. You can open this utility by either Start >Run > type in services.msc >OK or by going to Control Panel >Administrative Tools >Services. Here you can have various services selected to be in automatic (running), manual (only runs when you activate the program) or disabled (not running and not available to be run manually). If you are knowledgeable in what these services do, change the settings by double clicking the line and changing the drop-down to the desired action. If you are not sure ... DO NOT CHANGE!! You can really mess things up. Again, if you have any questions about the various services ask our members in the Q&A forum.
  • Another area to cleanup is the Registry. As programs are opened and shut, added and removed and settings are changed, registry keys are created. These keys tell Windows what to do. When you uninstall a program for example, registry keys are deleted, but not all. After awhile, your Registry will contain keys that no longer do anything .. they just sit there and start to take up space. There are third party Registry cleaners that will cleanup and dump these keys. One such cleaner is CCleaner (aka Crap Cleaner), it's a free program, the link can be found on our recommended software page. As mentioned above in cookie cleaning, this little utility will also clean up cookies and has an option to leave the cookies you don't want deleted.
  • Here's a brief description on its use, after downloading and installing Ccleaner:
  • Go to Start > programs > Ccleaner >Make sure the "windows" tab is selected >Under "internet explorer" tick the following boxes ...Temporary internet files - Cookies - History - Recently typed URL's (leave this unticked if you DON'T want to clear the drop down list in the address window of IE) and Delete index.dat files.
  • Next under "Windows explorer" > All boxes ticked except 'Other explorer MRU's' (leave this unticked if you DON'T want to clear lists such as the start un list)
  • Under "System" - Empty recycle bin - Temporary files - Memory Dumps - Chkdsk File Fragments - Old Prefetch data
  • If there are any cookies you want to keep (if you remove the cookie for a site you require a password for, you will need to re-enter your password when you next visit that site) ... click options > cookies > then keep the cookies you want. You may of course check any or all boxes as you wish, but these are the main ones we suggest.
  • Click the Analyze button and Ccleaner will scan the Registry for the 'orphaned' keys. When it's finished, click the Run Cleaner. You will get a popup window stating that 'The process will permanently delete files from your system' click OK . A message in the upper window will now state the 'Cleaning is Complete' , you may now shut down the program. It is suggested to do this about once a week or when doing your general maintenance with the other cleanup steps.
  • Finally, the key to having a smooth running computer is having a good maintenance routine and to be protected with a firewall, anti virus and anti spam programs. We have articles on these subjects and have a recommended utility programs page (free and retail), so please check this out. You can get to all of these articles and utility programs from the Home page.


Friday, June 1, 2007

7 STEPS FOR PREVENTING LAPTOP THEFT!!!!!!!!!


1. Never carry your laptop in an obvious laptop bag or carrying case. These are immediate flags for would be thieves. Small padded cases that fit just the laptop are available at most luggage stores. This allows you to carry the laptop safely in a hard or soft side briefcase.
2. Never leave your laptop unattended, even for a moment. Many thieves work in groups; one will distract you while the other carefully removes your laptop in its case.
3. Purchase Insurance coverage for your laptop. If it is company property, be certain under what conditions a theft is covered. If the laptop is your property, check with your insurance agent and determine if it is covered under your homeowners or renters insurance. Also what theft situations are covered, such as on business or pleasure travel. If coverage is not provided, obtain additional coverage as a rider to your policy.
4. Utilize a laptop security cable. We get numerous reports of laptop theft when the owner leaves his or her office or cubicle for just a moment to go down the hall or to get a drink of water. Another time to be cautious is during meetings, laptops are used, a quick break is called and when everyone returns, some of the laptops are missing. Remember thieves have better access than you might think and are very quick.
5. Be certain to back up all important data daily. Remember the hardest thing to replace when a laptop is stolen is the lost data.
6. Encrypt the most important data. The most valuable part of a stolen laptop is the data. Many groups have cash bounties out for particular information that can be resold for identity theft or competitive use.
7. Protect the data and access of the computer with strong password and or a hardware key device. Hardware key products include fingerprint identification devices or other access control devices that plug into the USB port.
Some Things to THINK about:
We can all learn to be more attentive to the people and our surroundings, so that we can protect our property and our lives.
1. Always be aware of your surroundings and the people in them.
2. Realize that you are the prospective PREY or VICTIM.
3. Always keep your belongings in your sight and preferably in direct contact with your body or a tether device.
4. Be suspicious of unusual activity and keep your property closer to you until this activity is over and any threat has diminished.
5. The use of laptop security cables to lock down your property or lock it together will significantly reduce the risk of theft.
6. Put a label or tape your business card to the top of your laptop. Too many business travelers are using the same brand and model of laptops leading to confusion and in some cases the picking up of someone else’s laptop when going through security. The business card or label provides identification quickly when retrieving your laptop or trying to prove ownership in a mix up or attempted theft.

REMOVING VIRUS FROM THE SYSTEM VOLUME INFORMATION FOLDER!!!!!!!!!!


Quite often Anti Virus scanners locate a virus, quarantine it then you find that the next day it's back again. What has happened is that Windows has included the virus into a System Restore Point when it creates one. The folder that contains the restore point information is the "System Volume Information" folder which is a protected folder.
"You may not even be able to see the folder at all"
There are two methods of ridding yourself of the virus if the scanner is incapable. Both require you to be logged on as an administrator.
First Method:
The first method is to remove all the restore points. Unless you are 100% sure you will never need to restore to a previous point then by all means do it.

1. Right Click My Computer, choose Properties then Click on the System Restore Tab. Place a check mark alongside "Turn Off System Restore On All Drives" Click Ok and close the Dialog Boxes.
2. Run your Anti Virus scanner again to make sure the virus is gone. You can choose to perform the task only in the folder where the virus was detected. In this case the System Volume Information folder.
3. Once you are happy return to System Restore Tab and uncheck the mark.While you are there highlight the drive or drives, click Settings and slide the slider to the left to around 2%. This will release a significant amount of hard drive space. Windows' default setting is to reserve 12% and on a 150 gig drive that can total 18 gigabytes. 2% will still give you enough room for an ample number of restore points. Click OK and close the dialog boxes.
4. Next, create a new Restore Point. Click Start, All Programs, Accessories, System Tools, Restore Points. Create a new one and give it any name you want.

Second Method:
  • The second method allows you to save your restore points but remove the virus.
  • This method requires playing around with system files so if you are not comfortable doing that, then use the method above.
  • First, note the location where the Virus Scanner located the virus. Often you will find this information in the scanner's log file. In this case the location will be a series of numbers. (it will look like BB33ED9C-9125-42AF-92C0-EA614B1F488E:RP45:A01197455)

1. Click On My Computer and choose Tools then Folder Options then click on the View tab. Scroll down till you see Hidden Files and Folders and check the "Show Hidden Files and Folders". Now scroll down to "Hide Protected Operating System Files" and uncheck it then down to "Use Simple File Sharing Sharing" and uncheck it as well.Close the dialog box.

2. Now navigate to the System Volume Information folder, right click on it and choose Properties then Click on the "Security" Tab . Click ADD and add the name of the user that is currently logged on. An incorrect name will not be accepted. Check all the boxes on the left column. Click OK and Ok again.

3. You can now open the System Volume Information folder.

4. Locate the number (it will look like _restore{BB33ED9C-9125-42AF-92C0-EA614B1F488E}) and open the folder. Look for the second part of the number (it will begin with RP). Open it, then look for the last part of the number your anti virus scanner showed (it will look like A01197455.ini_ ) and delete it.

5. Close down everything then reverse the above steps in order from step 4 to step 1.